Why Retaining Wall Installation Matters
Retaining walls do more than hold back soil. They also improve drainage, create level spaces, and enhance the look of your property. Proper retaining wall installation ensures your wall lasts for years, even under heavy pressure from soil and water.
Without proper planning, walls can lean, crack, or even collapse. That’s why following a step-by-step approach is essential for safety and durability.
Plan Your Retaining Wall
Before you touch a shovel, you need a plan. Ask yourself:
- What is the purpose of the wall? (Erosion control, decoration, garden terrace?)
- How high and long should it be?
- What material will you use? (Concrete blocks, stone, timber)
- Where will water drainage go?
Planning also includes checking local building codes. Some walls, especially taller ones, may require permits.
Prepare the Site
Clear the area where your retaining wall will go. Remove plants, debris, or obstacles. Mark the outline with stakes and string to guide your work.
Excavate the soil along the marked line to create a stable base. The depth of excavation depends on the height of your wall. A strong foundation is crucial for successful retaining wall installation.
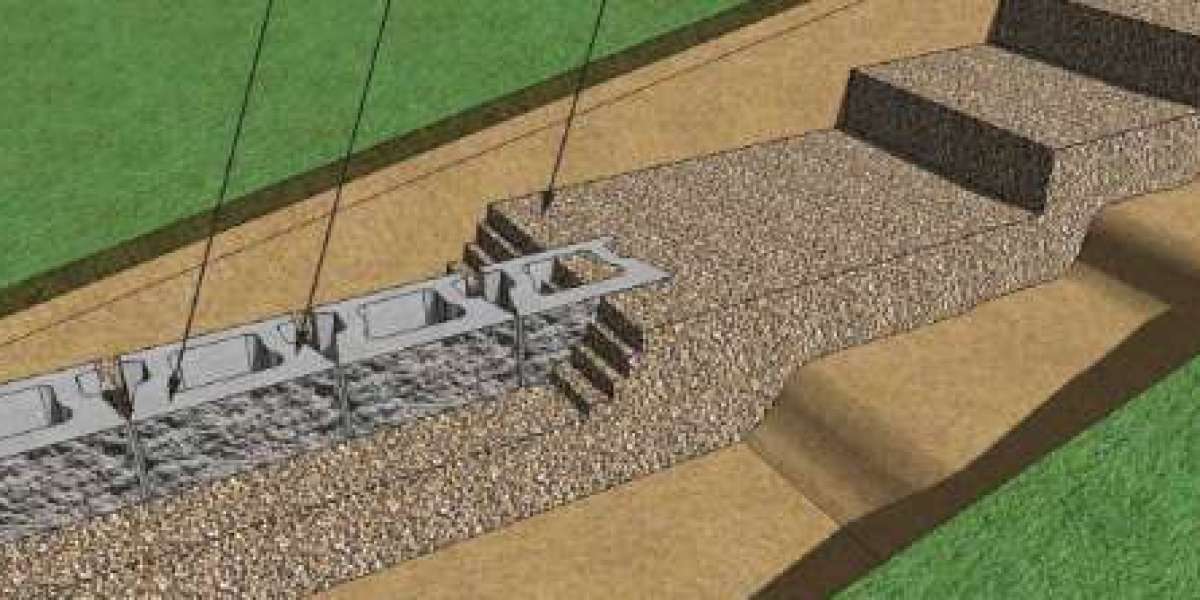
Build a Solid Base
The base supports the entire wall, so it must be level and compact. Use gravel or crushed stone to form a stable foundation. Spread it evenly and compact it with a tamper or plate compactor.
A proper base prevents shifting or leaning. This step might seem small, but it’s critical for long-lasting results.
Start Laying the First Course
Place the first row of your chosen blocks or stones directly on the prepared base. Make sure each block is level both front-to-back and side-to-side.
The first course is the foundation of the wall, so take your time to get it perfect. Mistakes here can cause problems later in the wall’s height and stability.
Continue Building the Wall
Stack additional rows carefully, staggering the joints for strength. Use a level frequently to maintain evenness. Depending on the material, you may need adhesive or pins to secure blocks in place.
Backfill with gravel or drainage material behind each course. Proper backfilling helps water flow away from the wall and prevents soil pressure from building up.
Include Drainage
Drainage is one of the most important aspects of retaining wall installation. Without it, water pressure can push your wall outward.
Install perforated pipes or weep holes at the base to direct water away. Ensure the backfill material allows water to drain easily, like gravel or crushed stone. Proper drainage protects the wall and extends its life.
Finish the Top
Once you reach the desired height, finish the top with capstones or a flat surface to give a clean look. Make sure everything is level and secure.
Adding landscaping elements, like plants or decorative stone, can enhance the wall’s appearance and blend it with your yard.
Inspect and Maintain
After completing your wall, inspect it for any gaps, tilts, or loose stones. Regular maintenance is key. Check the wall after heavy rain, and keep drainage clear.
Even a well-built retaining wall can shift over time. Maintenance prevents minor issues from becoming major problems.
Tips for a Successful Retaining Wall Installation
- Choose high-quality materials suitable for your wall height and soil type.
- Take your time with the base; it’s the most important part.
- Don’t skip drainage; water pressure is the biggest cause of failure.
- Use a level frequently for accuracy.
- Consider hiring professionals for walls taller than 3–4 feet.
Common Mistakes to Avoid
Many DIYers make these common errors:
- Skipping the gravel base or not compacting it properly.
- Ignoring drainage and backfill needs.
- Using low-quality blocks or materials.
- Not checking local building codes.
- Rushing through the first course and joints.
Avoiding these mistakes ensures your wall lasts longer and stays safe.
Why Hire a Professional
While smaller walls can be DIY projects, professional retaining wall installation offers benefits:
- Knowledge of local soil and weather conditions
- Proper equipment and techniques
- Ensured compliance with building codes
- Time savings and fewer mistakes
- Long-lasting, stable walls
A company like DFW Retaining Walls & Pool Demo in Kingston can handle residential, commercial, and parking projects. Professionals provide reliable results and peace of mind.
Conclusion
Proper retaining wall installation is both an art and a science. From planning and excavation to building and drainage, each step matters. A strong, well-built wall improves your property’s safety, appearance, and usability.
Whether you tackle a small garden wall or a large commercial project, following these steps will help ensure your wall stands strong for years.
FAQs About Retaining Wall Installation
Q: How deep should the base of a retaining wall be?
A: The base depth depends on the wall height and soil type. Typically, 6–12 inches of compacted gravel works for small walls, but taller walls require deeper foundations.
Q: Can I install a retaining wall myself?
A: Yes, for small walls under 3 feet. Larger walls or walls holding back heavy soil should be done by professionals for safety and durability.
Q: Why is drainage important behind a retaining wall?
A: Water pressure can push the wall outward, causing cracks or collapse. Proper drainage relieves pressure and prevents damage.
Q: What materials can I use for retaining walls?
A: Common options include concrete blocks, natural stone, timber, or brick. Choose materials based on style, strength, and budget.
Q: How long does a retaining wall last?
A: With proper installation and maintenance, a well-built retaining wall can last 20 years or more. Regular inspections and clearing drainage help extend its life.