A car wrap can turn an ordinary vehicle into a rolling billboard, a stealthy matte showpiece, or a one-of-a-kind chameleon that changes color with the light. But that final look depends less on the vinyl’s brochure photos and more on the choices made before the first stretch of film hits the hood. In Houston’s heat and humidity, small installation errors that would be cosmetic elsewhere can shorten a wrap’s life by years. This guide walks you through the practical do’s and don’ts of installing a wrap so your project looks great and lasts — especially if you’re searching for houston car wrap services or planning a local install.
Why installation choices matter — especially in Houston
Houston drivers face a tough environment for wraps: intense UV, high temperatures, and frequent humidity swings. Those conditions accelerate adhesive breakdown, promote edge lift, and fade pigments faster than cooler, milder climates. A proper installation reduces these risks by matching the right material to the vehicle, preparing the surface thoroughly, and controlling the environment while the film cures. The payoff is a reliable, long-lasting finish that protects factory paint and looks fresh year after year.
The Do’s of installing a car wrap
Do choose the right film for the job
For full vehicle wraps and long-term performance, pick a premium cast vinyl. Cast films are thin, flexible, and conform to complex contours without the tendency to shrink and pull away. Reserve calendered vinyl for short-term graphics or flat panels only. Selecting an industry-leading material up front is one of the most cost-effective choices you can make.
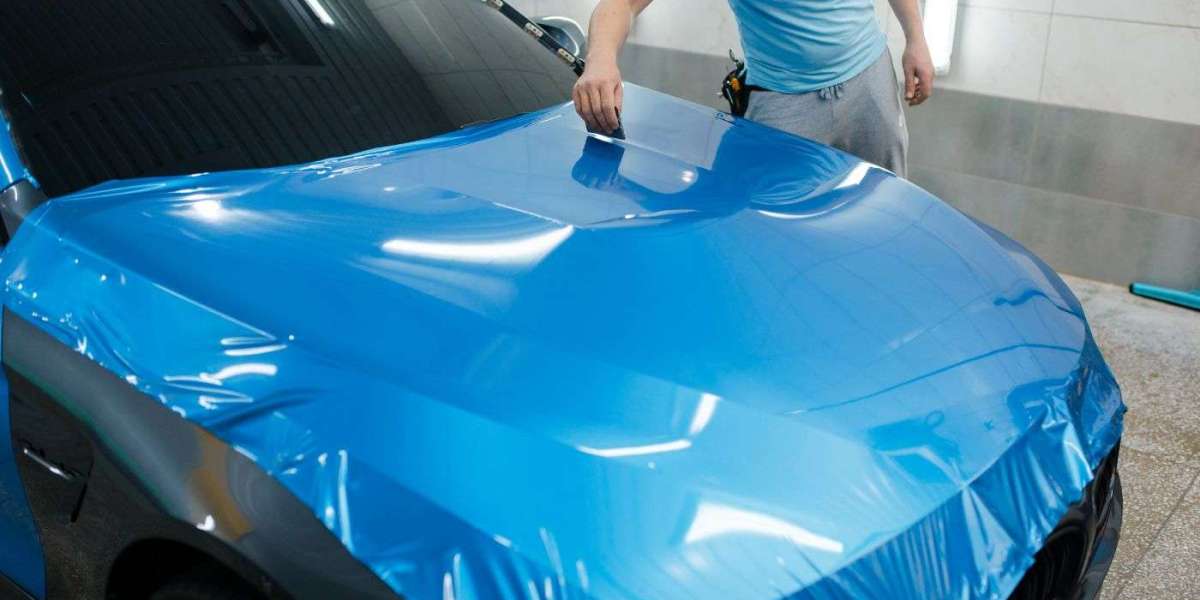
Do insist on proper surface preparation
Surface prep is non-negotiable. That includes a deep wash, chemical decontamination (iron and tar removal when needed), and a light polish to remove surface imperfections. Even small debris, wax residue, or oxidation will telegraph through the vinyl or prevent the adhesive from bonding properly. Paint correction before a wrap not only improves adhesion but also makes removal cleaner later.
Do install in a climate-controlled bay
Humidity and temperature affect adhesive tack and stretch. A climate-controlled facility gives the installer consistent conditions to heat-form corners, set adhesives, and avoid trapped moisture. In Houston, this single step dramatically reduces blistering and edge lift after installation.
Do remove trim, badges, and emblems when appropriate
Removing or partially disassembling trim and badges lets installers tuck film tightly and avoid visible seams. It’s a bit more work, but it prevents early peeling and gives a cleaner finished look. For certain parts, like door jambs and mirrors, a precise tuck is what separates a good wrap from a professional-grade wrap.
Do use structured adhesives and air-release technologies
Modern wrap films often feature adhesives designed to allow sliding during application and to evacuate air during squeegeeing. These technologies reduce bubbles and bruising and make complex installs much more forgiving. Ask your installer what adhesive system they use and whether it’s suited to long-term use in hot, humid climates.
Do apply overlaminates and edge-sealing where needed
Printed graphics benefit from a clear overlaminate that provides UV protection and abrasion resistance. For extra protection in high-impact areas, use paint protection film (PPF) on the front bumper and hood. Proper edge sealing — a careful application of primer or sealant where manufacturer recommends — prevents dirt and water from working under the film.
Do allow adequate cure time and follow care instructions
After installation, adhesives take time to fully set. Follow the installer’s recommended cure window before high-pressure washing or exposing the vehicle to extreme conditions. Encourage the vehicle owner to follow the provided maintenance routine to protect the investment.
Do document warranty, material, and maintenance terms
A transparent written warranty that lists the film brand, finish, and installer responsibilities protects both buyer and installer. It should also include cleaning instructions and clear removal guidance to prevent accidental damage later.
The Don’ts of installing a car wrap
Don’t skip or rush surface prep
Skipping a full decontamination or glossing over a paint correction will create problems. Trapped wax, silicone, or dirt can prevent adhesion and cause the film to lift. That seemingly small shortcut often costs more than quality prep.
Don’t use cheap calendered vinyl on full wraps
Calendered vinyl can be tempting because it’s cheaper, but it’s more prone to shrinkage and edge failure on complex surfaces and in hot climates. Avoid it for full-vehicle jobs you want to last.
Don’t install outdoors or in a dusty environment
Installing under the sun or in a dusty shop risks adhesive issues and trapped particles. Wind can introduce debris mid-install, and heat can make the film overly tacky and difficult to manipulate. Choose a clean, controlled space.
Don’t ignore edge tucking and seam strategy
Poorly planned seams or exposed edges invite water, dirt, and lifting. Tucks, overlaps, and sealed edges are essential. Never leave raw adhesive edges where rain and road grime can work their way underneath.
Don’t let inexperienced installers lead complex installs
A full wrap over a complicated vehicle (deep channels, textured trim, or aftermarket accessories) is a job for a trained installer. DIY attempts or low-skill shops are the most common source of premature wrap failure. Complex installs require patience, heat-forming skill, and an understanding of adhesives and film memory.
Don’t assume all finishes are the same
Matte, satin, gloss, pearlescent, and color-change films each have different handling characteristics and maintenance needs. Installers must adjust techniques — heat settings, squeegee pressure, and post-heat — to the specific finish. Treat each finish as its own material.
A practical installation checklist
Before any work starts, run through this checklist:
Confirm film type and finish (cast vs. calendered, overlaminate, PPF needs).
Document vehicle condition and perform paint correction if required.
Remove or mask trim, badges, and emblems as needed.
Clean and decontaminate surfaces thoroughly.
Install in a climate-controlled bay with proper lighting.
Use structured adhesive films with air-release liners when possible.
Tuck and seal all edges; apply PPF to high-impact zones.
Post-heat critical areas and allow recommended cure time.
Provide written care instructions and a warranty document.
Maintenance do’s and don’ts after installation
Do:
Hand wash with pH-neutral soap and soft microfiber tools.
Rinse seams gently with low-pressure water.
Park in shade when practical.
Schedule periodic edge inspections and reseal if needed.
Don’t:
Use abrasive brushes or strong solvents.
Immediately run the vehicle through brush-style car washes after install.
Use petroleum-based polishes on vinyl finishes (they break down adhesives and film).
Delay repairs to lifted edges; small lifts become big problems.
Case study: Graffiti Wraps — converting a Houston delivery fleet
Background: A regional delivery company in Houston needed a durable, branded wrap for a 12-vehicle fleet. They wanted high-visibility graphics, minimal downtime, and a finish that would resist Houston weather and frequent road grime.
What Graffiti Wraps recommended:
Premium cast vinyl with a rapid-air adhesive for fast, bubble-free installs.
Clear overlaminate on printed areas and PPF on hoods and bumpers.
Staggered scheduling to keep most vans in service while a few were wrapped each week.
A documented maintenance plan for in-house drivers.
Execution:
Each van received full surface prep and light paint correction.
Installations took place in a climate-controlled bay with consistent lighting.
Edge-sealing and post-heating were performed on every vehicle.
Graffiti Wraps provided driver training on washing and a one-year material and labor warranty.
Outcome:
The fleet completed with minimal downtime and consistent color across vehicles.
After 18 months of daily Houston routes, the wraps showed only minor wear on the most exposed bumpers, which were covered by PPF.
The company reported increased brand visibility and no major maintenance issues thanks to the preventive plan and professional installation.
Lessons learned:
Staggered installs minimize operational disruption.
Investing in PPF and overlaminates for high-wear zones saves money compared with frequent repairs.
Driver care habits (gentle washing, shaded parking) significantly extend lifespan.
Choosing the right installer in Houston
Look for these markers of a reliable installer:
A clean, climate-controlled facility and a clear install process.
Experience with the specific film brands and finishes you want.
Before-and-after galleries and references, ideally from local projects.
A written warranty that names the film and its expected lifetime.
Clear aftercare instructions and a willingness to schedule post-install inspections.
Final recommendations
If you’re searching for car wrap houston options, prioritize material quality, surface preparation, and a professional installer who understands how regional conditions affect adhesive performance. A well-done installation is the difference between a wrap that looks great for a few months and one that protects paint and turns heads for years.


